Jan 20, 2022
Google Grants For Nonprofits: The Comprehensive Guide

The Google Ad Grant program is one of the most powerful, consistent, and scalable ways to drive new supporters, volunteers, and donors to your nonprofit organization each and every month!
With a $10,000 monthly Google Ad Grant your organization can:
- Send upwards of 5,000 website visitors to your website every month (60,000/year)
- Grow your database of supporters as visitors subscribe, volunteer, and donate!
- Take your nonprofit’s online donations to the next level
Bottom Line: Your Google search presence should inspire and motivate individuals to join your mission.
Let’s get you set up.
Chapter 1: How the Google Ad Grant Works
501c3 nonprofit organizations are eligible to receive $10,000 in free, in-kind Google advertising every month. Imagine how $10,000 in free annual Google advertising can support your mission. How would potentially sending an additional 60,000 website visitors every year to your nonprofit’s website help accelerate and scale your organization’s revenue and social impact?
Nonetheless, when you are new to the Google Ad Grant, it can feel a bit daunting, to say the least. This guide has been created in partnership with the team at Community Boost Consulting, to provide a high-quality resource that will empower your organization to drive both revenue and results from the Google Ad Grant and help sustain and scale the impact your nonprofit makes in the world.
Google Grant stipulations you need to know

You can spend $329 daily on ads that will appear at the top of Google Search.
All Google Grant accounts need to maintain a minimum CTR of 5%. The required CTR was previously 1%, so this is a huge jump.
You can only promote text ads. You can’t use your grant to buy photo and video ads.

Ads must lead people to your website. You should embed all donation and sign-up forms.
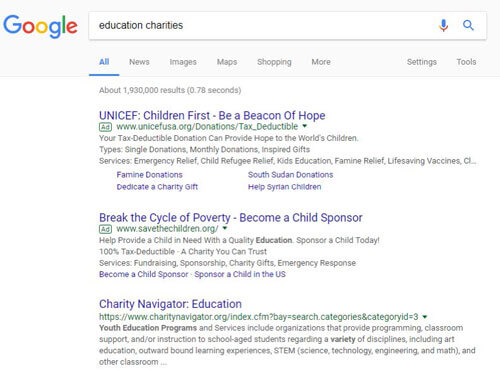
Due to these stipulations, most nonprofits only spend $300 of their $10,000 Ad Grant budget! This means that you should focus your keyword strategy on hundreds (or thousands) of long-tail keywords to use your entire Adwords budget each month.
Tip: To drive more awareness and giving via Google nonprofits can reinvest a portion of collected revenues in paid image/video display ads and remarketing.
Chapter 2: How to Apply for Google Grants
This is not your average nonprofit grant! First-time applicants usually spend 4+ hours filling out the application and eligible 501c3s are typically approved by Google in one week or less.
It gets better:
Below are the three steps your nonprofit organization needs to follow in order to receive your $10,000 in free advertising dollars.
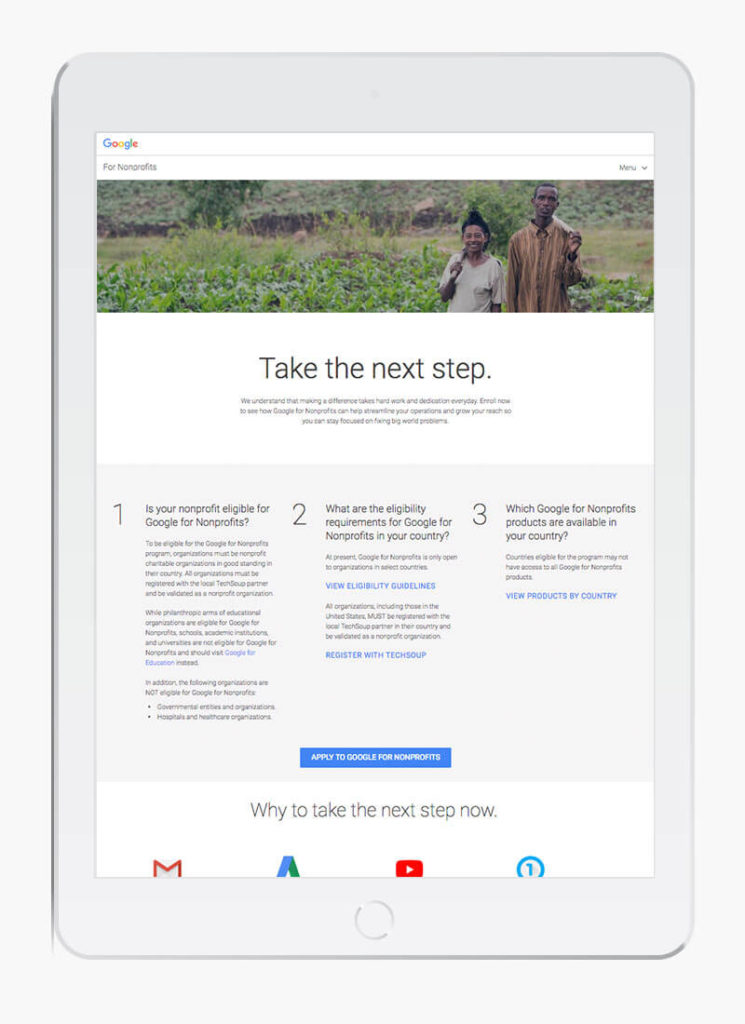
Step 1: Register with TechSoup

Google uses TechSoup to validate whether or not an organization is legitimate.
First, create an account and type in your EIN to register with TechSoup. Either your organization will be registered already or you will create a new account. If you are already registered, you will have to associate yourself with the organization.
Once you have access to the organization’s Techsoup account or you have created a new organization through TechSoup, you can move on to the next step. It can take up to a couple of days to either be validated or to gain access to an existing organization’s account.
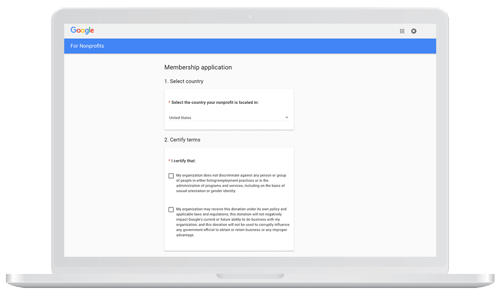
Step 2: Create a Google for Nonprofits Account
Second, you will create a new Google For Nonprofits or need to associate yourself with an existing one. You will need to be logged into your TechSoup account when taking this step because Google For Nonprofits will request a token code from TechSoup.
Go ahead and click the “Get a validation token from TechSoup” button. The only way to generate this code is by clicking this button. This will open your TechSoup account, click your organization’s name and a token code will be generated. Important: The code generated is valid for two weeks.
Now you will be brought to a new page that will have you create a new Google for Nonprofits account or you will associate yourself with an existing one (sound familiar?) Yes!
This is very similar to the TechSoup options. If your organization does not have an account, go ahead and create one. If your organization already has an account, reach out to your team members to see if you can gain access to the gain and add yourself as an administrator. If there isn’t anyone at your organization that has this information, go ahead and request administrative access. At this time you will be put into a waiting period of 14 days before being given administrative access.
*As long as the previous owner does not deny your access.
Step 3: Apply for Google Grant
Now that you are in your Google for Nonprofits account, you can apply for the Google Grant!
Go ahead and click “Enroll” under the Google Grant section, follow the steps very carefully to apply, because at this time you will be creating your actual AdWords account. Community Boost recommends moving through this part very slowly and carefully, be sure to follow each step as explained in the “AdWords account creation guide for Google Ad Grants”.
If you happen to not follow the steps mentioned, your application will be denied and you will have to re-enroll under and new AdWords account.
We recommend building your new account with only one campaign, one ad group, one ad, and a few keywords. Once approved, you can spend the time building the account more thoroughly, it is more important to get approved before really diving in and crushing a new AdWords account build.
Once you have submitted your new AdWords account customer ID number into the Google Grant enrollment, you will have to wait up to 10 days for approval. For this reason, you may want to map out checkpoints on a fundraising calendar. You will be notified via email or you can login into Google for Nonprofits to check your status. Some approvals take less than 48 hours!
Chapter 3: How to Get Started When Approved
The biggest success factor your organization must do to maintain your Google Ad Grant is to continuously manage your campaign.
- Once approved for a grant your organization will not need to apply again
- You must keep your ads up to date
- If you do not update your ads minimally every 90 days you will lose your ad grant
In order to be able to use Google Adwords to its full potential, you must understand the structure of campaigns and ad groups.
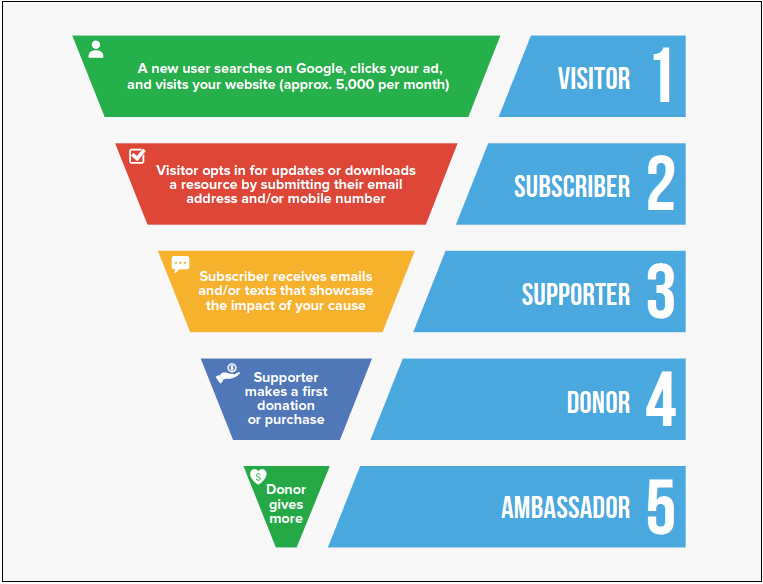
Develop Your Google Grant strategy funnel and understand your target audience
Before your nonprofit marketing team dives deep into Google AdWords, it is important to take a step back and think about the most strategic, high-impact way to approach your Google Ad Grant. Remember, the majority of site traffic that you will receive from the Google Ad Grant will be for any first-time, new visitors.
Community Boost likes to first think about your nonprofit’s different personas or different key audience members. Who are the people you both serve and who are the people who donate and support your mission? What makes them tick, what are they searching for, what are their demographics/psychographics, and of course, where are they located?
Once you outline and/or build your nonprofit’s personas, it is time to think about your nonprofit’s digital marketing funnel. The Google Ad Grant has the potential to send upwards of 5,000+ additional website visitors every month. However, it is a big ask to expect someone who has never heard of your mission or brand to donate right away. That is why your marketing and development teams need to think about the messaging and touch points needed to inspire and move new visitors into long-term supporters. Asking for donations can be very difficult and need to be catered specifically to donors.
Chapter 4: Building Google Adwords Campaigns

Here’s how to make it all work:
In order to get the most out of our Google Grants, you need to know the best practices for building and optimizing your Google Adwords campaigns.
On top of identifying hundred (or even thousands) of Google search terms that relate to your nonprofit organization, you will need to write ads with powerful headlines and strong call-to-actions.
It is important to focus on the language of your cause and make it easy for individuals to get involved.
Every Google AdWords account has two main aspects you need to know:

Campaigns
Campaigns contain as many ad groups as you would like within them. The two main things you need to understand about campaigns are that this is where you control the budget as well as where you control the targeting (where you show your ads). Campaigns are generally focused in one of two ways. Goals and location targeting. In today’s example, we will be focusing on goals.
Ad Groups
Within each campaign, we can have essentially unlimited ad groups. An ad group is a group of keywords around a particular theme. In this section, we will be going over an example of this and for this case, imagine we are a nonprofit working to save our oceans. The ad group we will be focusing on is how to get rid of the trash in our oceans. Refer to the example below to see how campaigns and ad groups can be laid out.
Finding Keywords
We will start by diving into the example of creating the ad group of “removing trash from our oceans” within our awareness campaign. The purpose of this campaign is to find people who have never heard of our nonprofit but are interested in helping the cause that we serve (saving our oceans).
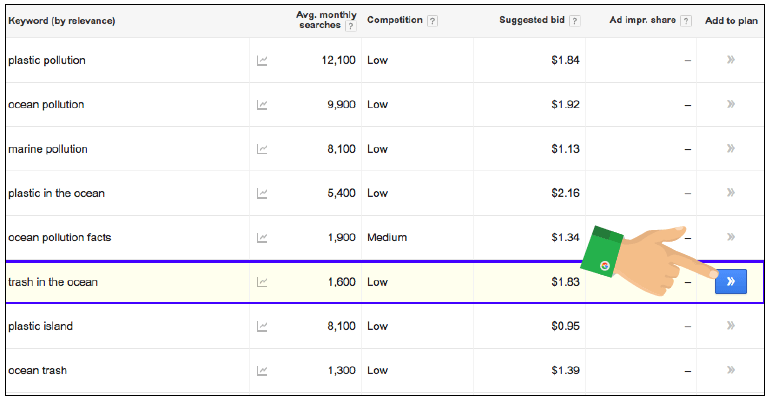
The first thing we need to do is find out if there is search volume around this topic. For this, we will dive into the keyword planner. This is an amazing free tool offered by Google to find search volume around whatever people are searching for.
An Example search query: “Trash in our oceans”

When we type this into Google’s keyword planner, we will get a bunch of keywords relating to what we put in the keyword planner. You’ll notice there are both relevant and irrelevant keywords. This is because Google does not know exactly what we are looking for. We want to add all the relevant keywords surrounding “removing trash from our oceans”. To add these, click the arrow on the right side of the keyword.
Note, if there are not any relevant keywords from Google’s suggestions then this is an indication that people are not looking for this online and you will now want to test a different topic. We don’t want to spend time building out an ad group if it will never be triggered online.
Now that we have a list of relevant keywords, we want to save this to the account. Simply click the save button.

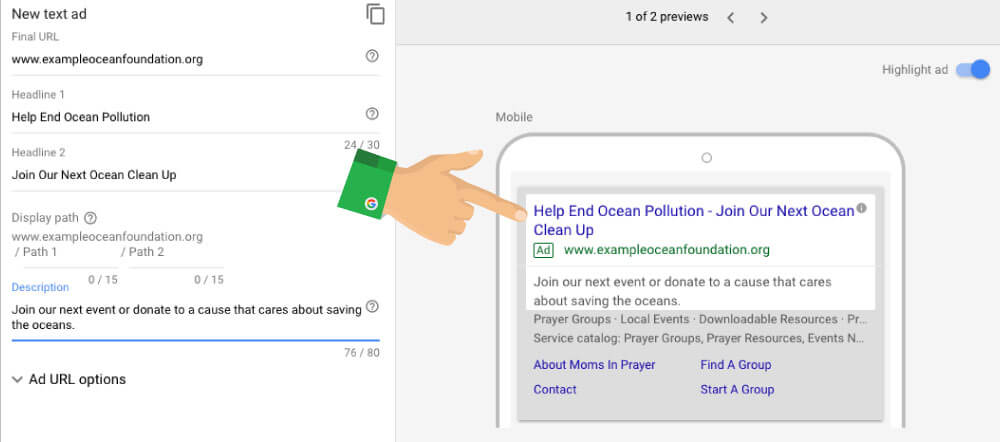
Writing Ads
Now that we have our keywords within our awareness campaign, more specifically our “removing trash from oceans” ad group, it’s time to write the ads for this ad group. The best practice for writing an ad is that you want to include the keyword someone typed in within your ad. This does two things: It shows the ad is relevant to what our user typed in and it helps with Google’s algorithm.
In the next part of the ad, you should concentrate on how to get people’s attention. You want to include either a benefit, statistic, or some other way that gets the attention of the user. The last thing that you need to be aware of is the call to action. Here we want to tell the user the action we want them to take once they click on your ad.
We highly recommend that you A/B test your ads which essentially means we are showing different ads to observe which performs best. For more in-depth explanations on this, refer to this blog post.
Another important aspect for ensuring your success is location targeting. This is done at the campaign level under the settings tab. It’s important to realize that you can target your ads in any level of detail that you want. You can target at the country, county, city, and zip code levels. Additionally, you can even target within a radius of a certain location.

Ongoing Optimization
Once your Ad Grant is up and running, there are optimizations you can be doing on a daily, weekly, or monthly basis so that you get better results as time goes on. Keep in mind the more you put into it, the more you will get out of it. Below we will talk about negative keywords, ad group expansion, and changing ads.
Negative Keywords Research
In AdWords, you are able to see what exact keywords someone used to trigger and click your ad. Sometimes the search queries will be relevant and sometimes they will be irrelevant. Over time, the goal is to get 100% of the keywords to be relevant. In order to do this, you click the search terms tab to find the keywords that triggered your ad. You can scan the list of keywords and anything that is irrelevant you can add as a negative keyword. When you add a keyword as a negative keyword, it prevents your ad from showing in the future when someone uses that negative keyword.

Ad Group Expansion
You may not max out your full grant, so you will want to add in more ad groups. These ad groups can be around various events you have, new programs offered, current events relating to your nonprofit, or more relevant topics that you did not create when you first built the campaign. To do this, you repeat the process described earlier when creating an ad group.
Changing Your Ads
If you find you are not getting people clicking on your ads, try rewriting them to better appeal to your end user or pause the ads that are low performing because ideally, you are testing multiple ads for each ad group. These are only a few of the ways that you can optimize your account to get better results every month. For example, you can change what device your ads show up on, the time of day, and more.
Chapter 5: Utilizing Google Analytics

Linking your Google Analytics account and Google Adwords accounts will allow you to get the data you need to make informed decisions about what users do after they click links in your ads.
This includes the ability to:
- Track website visits
- Track website conversions (volunteer sign-ups, donations, event registrations)
- Track page performance (bounce rate, session time)
Importance of Google Analytics (GA)
When we talk about analytics, we’re really talking about the traffic and metrics collected from the people visiting your website. Google Analytics is an extremely powerful and free tool from Google that tracks, reports, and gives insights on all of your website traffic. Some of the most important reasons your organization should be using GA are:
Understanding your supporters
Have you ever wondered about the type of people donating to your organization? GA helps you track the age, geographic location, and additional demographics of the people who most frequently engage with you. These insights are invaluable for any organization trying to expand and grow through online marketing channels.
Information about your website
Through the different areas that make up GA, organizations are able to more accurately see what parts of their site could use improvements, and also become more aware of opportunities. With a little training and practice, you can quickly see what pages of your site people engage with the most.
Custom trackable goals
Goals are a way of telling Google Analytics what your desired goals are – do you want people to go to your blog pages, donate a certain amount of times per month or join your monthly newsletter? Using analytics goals is an easy way to benchmark the performance of your own marketing.
Setting Up Analytics
Check out this Google Analytics video below or this setup guide from Community Boost, which breaks down the basics of setting up your own GA account so that your organization can begin to gather and use the valuable data it provides!
Google also has tons of additional resources that can walk you through the process if you get lost.
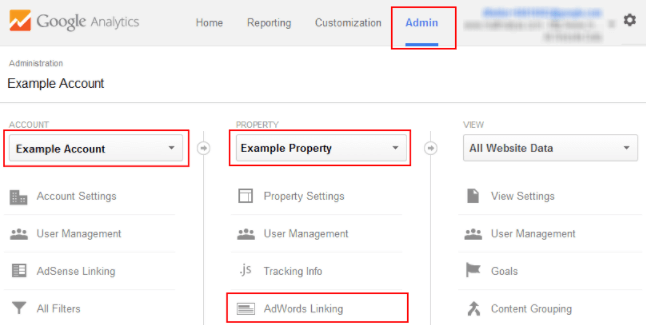
Linking AdWords and Analytics
Linking your accounts is extremely important! Having conversion goals in your AdWords account lets you assess how your AdWords account is performing and helps you make more informed decisions about how to optimize it. Without knowing what keywords are helping you reach your goals, your AdWords data loses a lot of its value.
It is also an important factor in determining if Google will show your AdWords ads to people online! Google has an entire algorithm that asses and determines if and when your ads will be shown online. When Google sees that you have goals in your AdWords account, Google’s algorithm is more likely to show your ad over an account without them.
10 Quick Steps to Link Your AdWords and Analytics Accounts
- Log into your Google Analytics account
- On the bottom left-hand side of your account click > gear icon
- In the middle column, under products, click > AdWords Linking
- Click > New Link Group (You will then see a list of AdWords accounts)
- Click > the AdWords account you are wanting to link and click > Continue (The accounts shown are based on the Gmail address you are logged in as at the time)
- Under link configuration, you will want to click > Linked Views and then select your view and then press > Save
- In your Google AdWords account click the little gear in the top right and click into > Account Settings
- Expand the Linked Accounts on the left-hand side and click into > Google Analytics
- Now you should have views available. Expand them and select the domain you are setting up. Click > the small Add button. Then press > Save
- Celebrate! You have now successfully linked your AdWords account with Google Analytics
Google Data Studio Reports
Now that you have tons of insights about your website and AdWords account, what’s the best way to sort through it all? Google Data Studio reports are free, customizable reports that turn your data into informative dashboards. These reports are easy to read, easy to share, and can be fully customized to your organization.
You can read the Data Studio reports capabilities here, but you can see the outline of them all below.

Easy access to data
Easily access all the data sources you need to understand your business and make better decisions.
Data transformation
Transform your raw data into the metrics and dimensions needed to create easy-to-follow reports and dashboards — no code or queries required.
Give your data life
Data Studio gives you the ability to create meaningful, shareable charts and graphs that bring your data to life.
Power of the collective
Harness the collective wisdom of your team and work together quickly, from anywhere.
Chapter 6: Drive Results and Revenue

By now you have thousands of new socially conscious people visiting your site every month. How do you capture their contact information to ensure they receive communications, text messages or otherwise, from you and keep coming back?
Adwords campaigns should be measured and each of the conversion percentages of your ads should be compared. Using Adwords conversion code on your website thank you pages, google tag manager and Google Analytics will collect all the conversion data you will need.
Optimize Quality of New Visitors, Scale Traffic, and Increase Conversions
Are you currently asking for new visitors’ contact information? If so, how are you asking for it?
We’ve all seen the Call To Action: “Subscribe to our Newsletter” too many times to count, and most visitors will be numb to this messaging. Even though your team will still be sending out the same content, we want to rethink how we request a user’s information.
Think about the value that your nonprofit provides to its supporters. Why would people love hearing from you? Email addresses and mobile numbers are valuable, and we want to communicate that the visitor will be getting value in return. Turn your creativity on high and think of a new way to invite the user to your awe-inspiring, impact-laden, fun, and compassionate updates. Best practices for text message campaigns.
Options For Capturing Email and Mobile Numbers On-Site
Now that you have your new messaging and value offer defined, it’s time to think about how to implement them on your nonprofit’s website. We will examine some different methods of capturing new visitors’ contact information while they are on your site.
Let’s look at the Welcome Mat, the Scroll Box, and the traditional Pop-Up and Landing Pages.
Welcome Mats
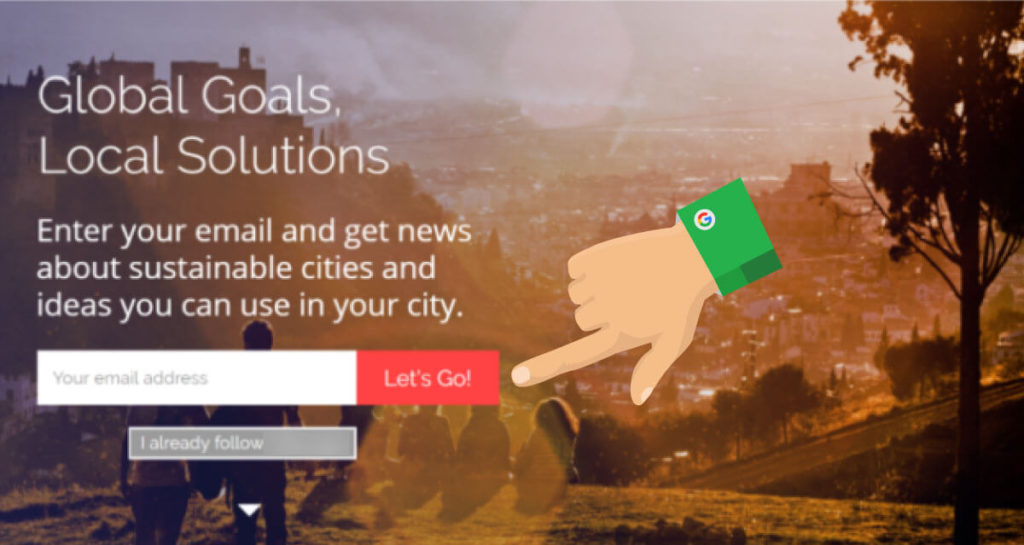
A Welcome Mat is an interstitial that a user must interact with before reaching their destination, typically showing before their first-page view. It gives you a full screen to share the value of what a user will get when they opt-in for updates. It allows for a strong visual impression and ensures that all visitors will interact with it at least once. Ensure that there is an option for those who already receive your updates so they don’t have to see the Welcome Mat again.
Welcome Mats tend to have the highest conversion rate of all the elements we’re discussing here but can really frustrate users who already subscribe to your updates. This is because they must interact with the element before accessing your website. If you’re planning on using a Welcome Mat we’d recommend not showing it to mobile visitors (as interstitials hurt your organic mobile search results), and only targeting traffic that you know isn’t subscribed to your lists (like Google Grant traffic).
Scroll Boxes

A Scroll Box looks similar to a Pop-Up, except it sits on the bottom left or right corner of a web page instead of blocking the visitor’s view and forcing them to interact with it (which is what pop-ups do).
A Scroll Box even moves along with the reader as they scroll and can be closed at any time. Because Scroll Boxes are not counted as an interstitial (something that must be interacted with before accessing website content), we recommend leaving them turned on for mobile users.
Since they are more passive than a Welcome Mat, they tend to have lower conversion rates.
Pop-Ups
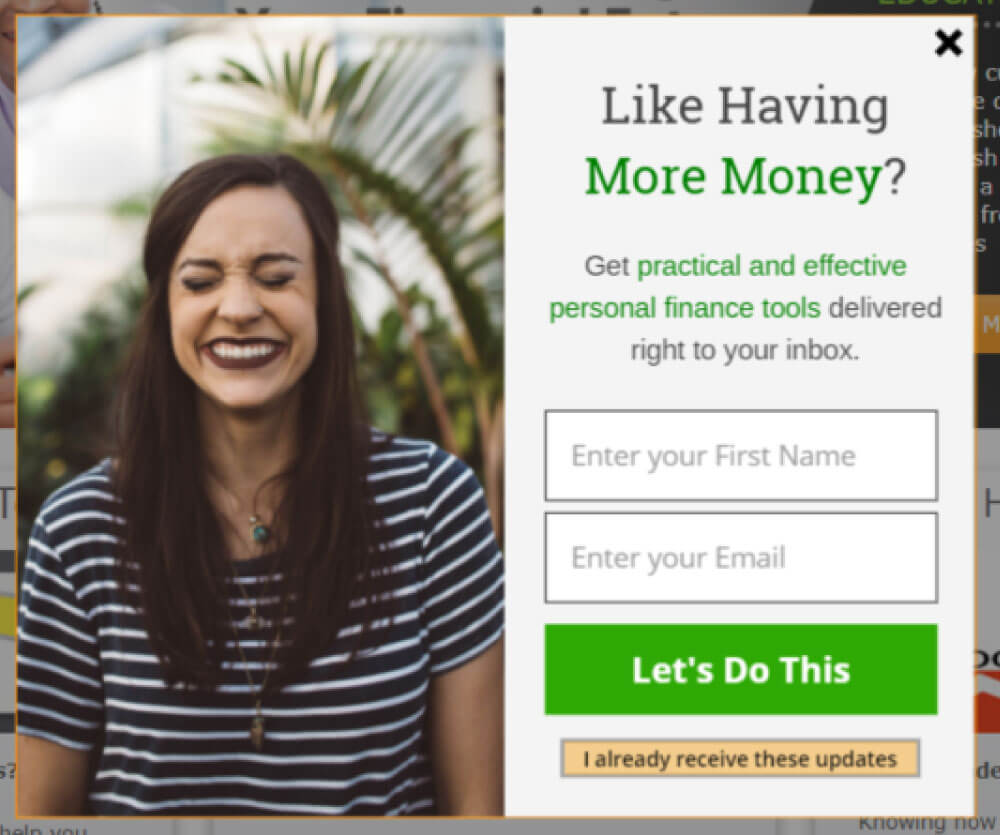
This one requires little introduction. A visitor is on your website and after a set amount of time on a given page, a form pops up blocking content until it is dealt with. While many people have tuned out pop-ups and close them without even thinking, in the right places on your website they can still be effective. We want to be cautious of which pages these show on and how long we set our timers for.
When Community Boost uses Pop-Ups, they do not allow them to show on a user’s first page view. Furthermore, a user must be on the following page for at least 30 seconds before they are shown a Pop-Up. This means it could be shown on a visitor’s fourth page view, where they spent 1 minute on the homepage, less than 30 seconds on the next two pages, and finally 30 or more seconds on the fourth page. By then we know the user is more engaged and would be more open to your nonprofit making an ask via Pop-Up.
Landing Pages

Build Landing Pages That Capture Email Address In Exchange For Value
Now that your Google Grant has been running for some time, you should see trends emerging within your campaigns around specific ad groups or keywords. Look for trends around people looking for information, statistics, or an answer to a specific question. Does your nonprofit have the information/statistics/answers that these visitors are looking for? If so, you can build a page dedicated to delivering the value the user is looking for in exchange for their contact information.
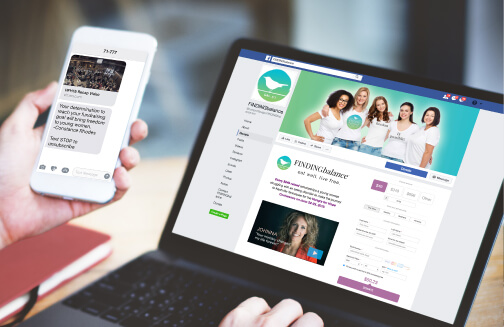
Let’s look at an example. With Moms in Prayer, Community Boost was able to identify large amounts of visitors searching for “Prayers for my Children” in a variety of ways. They assisted Moms in Prayer in building a visually compelling landing page that offers a piece of content “31 Days of Prayers Today!”
In exchange for their contact information, a Google Grant visitor to this page gets the content sent right to their email address.
In for-profit digital marketing, this strategy has been coined the “Lead Magnet” strategy, where organizations develop pieces of content that attract leads due to their innate value. The only option on this landing page should be to download this piece of content or go back. Keep links to your own site, phone numbers, and other calls to action off of this page.
That might sound cold or counter-productive, but if you put yourself in the visitor’s shoes it actually makes sense. That person is searching for specific information or answers (remember we identified them earlier), and instead of bombarding them with options we present them our version of a solution and let them choose whether or not to access it.
Be wary of the traffic you choose to send to this landing page from the Google Grant. We don’t want to send anyone here who is explicitly looking to get involved with your nonprofit. If you were a nonprofit solving child hunger, for example, we would not want to send a user searching “donate to end child hunger” to a landing page where they can only download a piece of content. We would want to send them directly to your site so they can complete their transaction.
On the other hand, we wouldn’t want to send a user typing in “hungry child statistics” to the full website (if we have a targeted Landing Page), as they would likely get what they’re looking for and never return. Instead, we would send “hungry child statistics” to a landing page offering a “Child Hunger Guide”- for example – in exchange for their contact information.
How To Structure Your Landing Page
Once you’ve chosen the need your landing page will meet, and built the content that delivers on it, it’s time to construct the actual page. There are incredible programs out there that let nonprofits build beautiful and professional landing pages. A few favorites are ClickFunnels, Unbounce, and LeadPages. There are differences in pricing and features offered between them, but they all accomplish the same goal.
Start off by finding a visually compelling image that creates an emotional feeling you want the page to have. If your nonprofit does not have these image assets internally, try checking unbounce.com, pixabay.com, or another free HD image-sharing site. You can also shop stock photos for the right image – it’s very worth it in the long run.
Headlines
Once you have chosen an image that sets the right tone for the page, you will write a headline that grabs the visitor’s attention. Surprising facts (Over 1 million children…), questions (Did you know…?), and assumed statements about the visitors’ behaviors (You’re here because you care) are just a few examples of headline categories that work well for landing pages. Stay away from calls to action here like “Help End Deforestation.” People that would respond to that kind of messaging should have been sent to your website in the first place – they are looking to get involved and don’t need to be warmed up with a landing page.
Body Copy
Underneath the headline is where your nonprofit can describe the offer and how it fulfills the need the visitor originally came to the page with. Giving some specific details about the content can be helpful here, and facts are good supporters in this section as well. Body copy following a strong headline can be anywhere from 2-6 sentences arranged in 1-2 paragraphs.
Take the needed time to sculpt your paragraphs properly as well. With a small amount of copy, your nonprofit should be able to arrange all of the words in a visually appealing fashion. Remember, we are ultimately asking for their contact information and need to build trust. The most trusted websites in the world are almost always clean-looking and have text that is uniform and well-related.

Additional Page Sections
What you want to say, following this preliminary offer section, is up to you. One section sharing what your organization does and its impact can be helpful for building credibility and trust, but we want to keep the overall focus on the piece of content and not your nonprofit. A section showing an image preview of the Lead Magnet and bullet pointing out additional pieces of information that are contained within is a great idea. Always end your landing page by offering the content one last time at the bottom of the page.
Conclusion
For nonprofit leaders that are frustrated by low website traffic and lackluster online revenue, the Google Ad Grant has proven to be one of the most consistent and scalable ways to accelerate and increase your organization’s impact.
We hope this guide empowers your nonprofit to not only get approved for your $10,000 per month Google Ad Grant, but more importantly, helps send thousands of qualified visitors every month that are inspired to support, volunteer, and donate to your cause.
Related

Navigating Nonprofit Success: An Executive Director’s Guide to Excellence
The executive director is the most important role in the management of an organization, so…

Budget Planning for Nonprofits: Ensuring a Successful Fundraiser
If you’re planning a fundraiser, you’ll need a good budget. A fundraising budget plan is…

Why Donors Love Success Stories
When someone decides to donate to your organization, two crucial elements must come together — their…
